- DC Power Products
- Anderson Powerpole Connectors Powerpole PP15-45, SB175, Housings, Contacts, Mounts, Kits
- Adapter & Extension Cables Powerpole, Automotive Plug, SAE, 5.5x2.1mm, Two-Way Radio
- Batteries (LFP/LiFePO4) Bioenno Power, Victron Energy, LiFePO4/LFP Batteries
- Battery Management & Relays ACR/VSR Isolators, LVD, Combiners, Switches, Relays, Timers, 12V/24V
- Charging, Conversion & Supplies Battery Chargers AC/DC & DC/DC, MPPT, Pure Sine Inverters, Power Supplies
- Circuit Protection & Fuses Blade Fuses, ANL/MIDI/MRBF, Breakers, Holders, Fuse Blocks
- Crimping & Electrical Tools Ratcheting Crimpers, TRIcrimp, Strippers, Cutters, Die Sets, Coax
- Panel-Mount Components USB-C PD, 12V Socket, Rocker Switch, Volt/Amp, Bezels, Pass-Thru
- Power Distribution PowerHubs, Bus Bars, Terminal Blocks, Power Posts, Fuse Blocks
- Power Monitoring & Meters Voltmeter, Ammeter, Watt Meter, Shunt, SoC, Bluetooth, VRM
- Solar & Portable Power Folding Solar Panels, MC4, MPPT, Portable Power, Cables
- Terminals & Wiring Accessories Heat Shrink, Ring/Lug, Spade/Fork, Splice, Waterproof, Marine
- Wire & Cable
- Wire & Cable Reels Red/Black Zip Cord, Hookup Wire, PTFE, Silicone, Welding Cable
- Terminals & Wiring Accessories Heat Shrink, Ring/Lug, Spade/Fork, Splice, Waterproof, Marine
- Custom DC Power Cables Design Custom DC Cables, Live Pricing, USA Built & Shipped Fast
- Adapter & Extension Cables Powerpole Cables, Adapter Cables, Extension Cables
- Two-Way Radios
- Help Center


Anderson Powerpole® Assembly Instructions
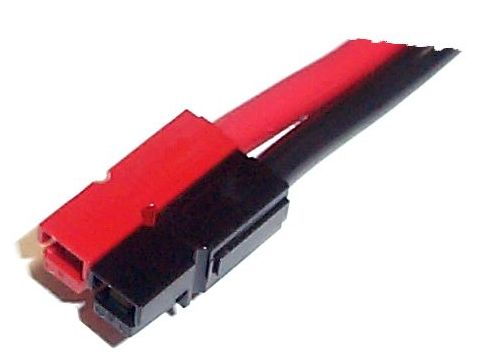
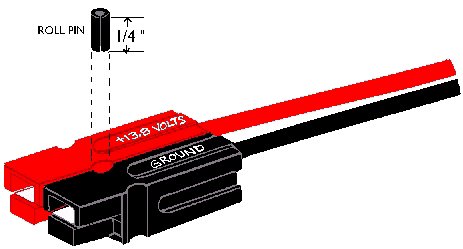
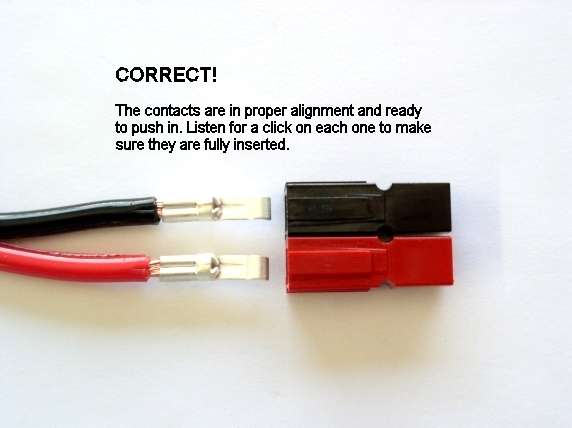
Assemble the red and black plastic housings together correctly on the first try, they fit snugly and can be difficult to get apart. See the picture below for ARES /RACES standard orientation. Note that you can assemble the red and black insulated housings in other ways for special applications.
Put the connector housings together before putting the connector pins in, this is easier, especially when using heavy paired wire.
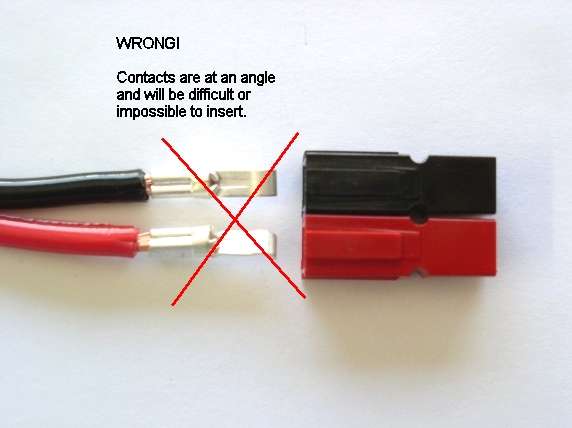
Before soldering or crimping the contacts on to heavy paired wire, orient the contacts so that they are both facing the correct direction so that they go in the housings without twisting the wire.
The plastic housings are held together with dovetail joints. Always slide these joints together! They will be damaged if you try to snap them together or apart. They ONLY slide together in one direction. This should be obvious by looking at them carefully.
floatsPowerwerx recommends the use of slotted retaining pins. Others do not like the possibility of them falling out in service. If your application is critical and that you want to make the pairing permanent, you can use a cyanoacrylic glue (Crazy Glue) to hold the connector bodies together.
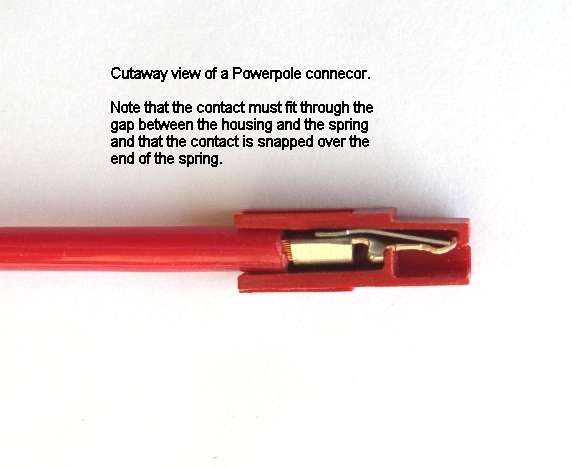
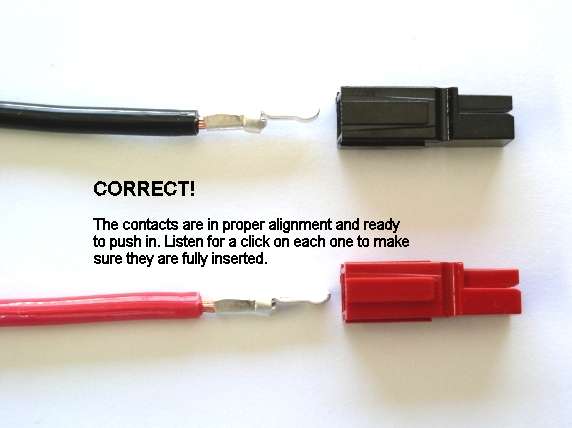
The contacts go in the housings in only one way. Insert the contacts with their sharp edge down against the flat spring that is in the housing. They should slide in and click. If you do not hear a click or they are not fully seated, fix them. When they are inserted fully you should notice that the contact and its wire "floats" slightly inside its housing. When looking in from the front of the housing the contact tip should slide over the top of the internal hosing spring. This is the clicking sound that you hear.
Be careful when crimping. You may make the contact out of round, and it will not slide into the contact easily. This may occur with different types of crimpers and various gauges of wire. To fix this situation you may have to rotate the contact 90 degrees from the original crimping orientation and re-crimp either with the original crimper or a pair of pliers. In any case you need to make the barrel of the contact round again so it can slide in the housing.
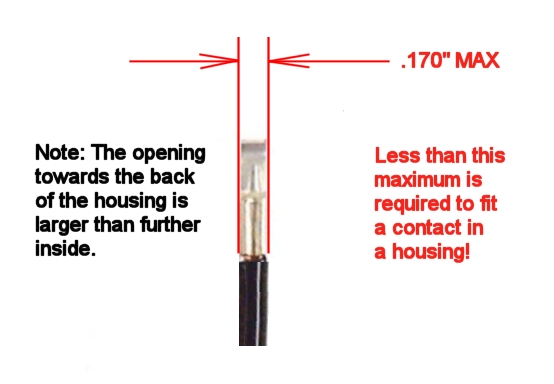
YOU WILL NOT BE ABLE TO INSERT THE CONTACTS INTO THE HOUSINGS IF THEY ARE TOO WIDE AFTER SOLDERING OR CRIMPING!
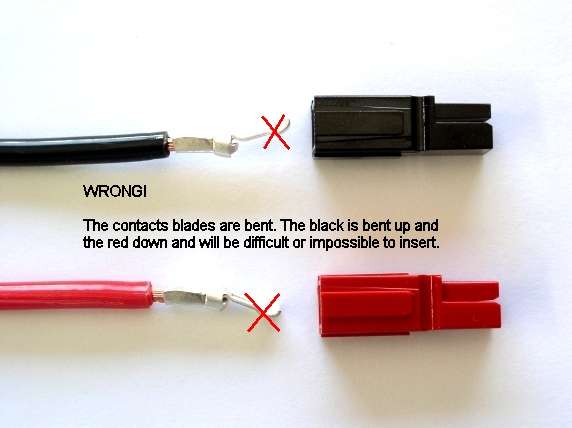
Tug slightly on the assembled connector to make sure the contacts are locked in place. If you have trouble getting the contact to lock into the housing you may have squashed the contact wider deformed it somehow. Look at the side profile of the contacts before and after crimping, you may have to bend it back straight before inserting it into the housing.
When soldering the contact pins, be careful not to use too much solder. Keep the solder inside, where the wire goes. If a blob of solder gets on the outside of the connector body, you may have trouble putting the contact into the housing. If you get solder on the contact surface area you will not make a good contact.
When crimping the contact pins use a crimp that contains the wire completely inside the pin and doesn't spread the connector apart. A good crimp is one where the dimensions of the crimped portion are no more than an un-crimped pin. If the crimp is flattened out, you will not be able to easily push the pin into the body. If you bend the contact blade in relation to the crimp area you should straighten it before putting it into the body.
It is possibly to use larger or smaller gauge wire with the 30 and 45 amp connectors. The 30 amp contacts will work with difficulty with #10 wire if you cut the end cleanly and carefully put each and every strand of that wire into the pin. It may be is easier to use 45 amp connectors on #10 wire. Using 16 gauge or smaller wire in a 30 amp contact requires that you double or triple up the wire to fill the crimp receptacle of the contact to get a good crimp.
A properly crimped contact should have a minimum hold on the wire of more than 25 pounds. A pair of connectors should snap together with 6 to 8 pounds force.
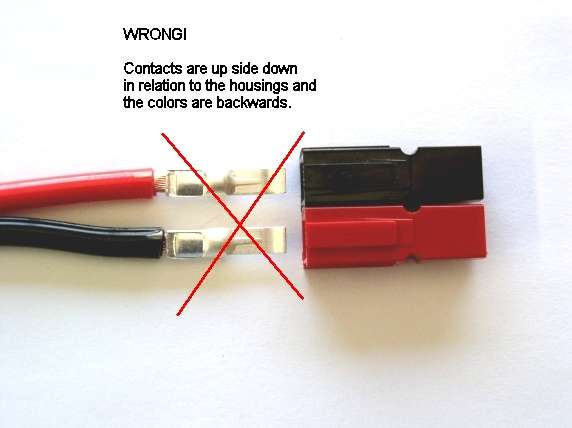
Last but not least, MAKE SURE you have the polarity correct before plugging in your equipment. "Measure twice, cut once" as the saying goes.